To prepare the assessment definition, you will specify the correct answer(s) and corresponding point values for each question, and then identify the curriculum objective(s), benchmark(s), or other curriculum areas each question measures.
If you have a collection of aligned question items available in the database and wish to use that to generate an assessment, you should instead use the process described in Create an Assessment Definition Using Question Items.
Create an Assessment Definition
-
Select Assessment >Assessment Library.
To view existing assessment definitions, click the check icon next to the area for which you want to view assessment definitions. The number to the right of the check icon (e.g., x 12) indicates the number of assessment definitions currently available for that area of the curriculum.
-
Click Add New. The Add New Assessment Definition screen appears.
-
Enter a unique name for the assessment definition.
-
In the Stored At field, click the Select link to specify where in the curriculum the new assessment definition will be stored. Expand the curriculum outline so you see the curriculum area you want to select, and then click the check icon next to the desired area. For example, if the assessment definition will address a wide variety of benchmarks under third grade mathematics, then the assessment definition should be stored under "Grade 3 > Math". In this example, "Grade 3" would be too broad, and "Grade 3 > Math -> Fractions" might be too narrow.
-
In the Ownership field, select Public or Private. All users can access public assessments, but only you can access your private assessments. Your access privileges determine the type of assessments you can create: public, private, or both.
-
In the Assessment Tags field, check the tags that apply to the new assessment, if available. You can also click the + Add New Tag link to add a new tag.
-
In the Method field, select Define Answer Key Only.
-
In the # of Questions field in the Details section, enter the number of questions in the assessment.
-
If you had planned to create an assessment with multiple sections, enter the number of questions that will be in the first section of the assessment.
Single-section versus multiple-section assessment
Most assessments will have a single range of question numbers (e.g., 1-50). Sometimes it is necessary to create a multiple-section test where each section has its own independent range of question numbers. For example, you could create a two-section test with a section covering reading and a section covering language. A multiple-section test may require a specialized optical mark reader form or card unless the test sections have non-overlapping ranges of questions.
-
-
Select the curriculum outline level that will be assessed (the curriculum outline to which you want to align the assessment questions).
-
Depending on how your curriculum is set up, there might be only one option.
-
-
If you have a library of rubrics set up, they are listed in the Assessment Rubrics section for selection. If not, you will be able to create one later. Select the rubric(s) for the assessment, if applicable.
-
Click Accept.
Multi-Section Assessment Definitions
Consider creating a multi-section assessment in the following situations:
-
You want to divide the assessment sections so that you can capture section scores for individual sections. For example, you could have a two-section assessment where one section assesses reading and the second section assesses writing. You can then capture the reading score, the writing score, and the overall score. Note that with a single-section assessment, you get a total score (and the scores on individual curriculum statements).
-
You want to assess curriculum statements at more than one level of the curriculum. For example, you could have a two-section assessment where the first level assesses objectives and the second section assesses more general standards. Each assessment section can directly assess one level of the curriculum hierarchy, although a feature called Rollup Processing (described below) allows you to assess one level and "roll" the results up to a broader level.
-
You want to have an assessment section with multiple-choice questions followed by an open-ended section scored by the teacher using a rubric. Although you could combine both into a single section, separating them enhances clarity and allows you to see the score on each individual section.
Create an Answer Key for the New Assessment Definition
-
In the Add New Assessment Definition (Answer Key Only) screen, enter the answer key by clicking the correct answers or by clicking the first question and typing the answer key.
-
If you have cases where questions are worth multiple points, partial points, or where more than one response in a question is worth points, then click the Switch To Advanced Mode link (directly above the answer key). Advanced mode allows you to specify the precise point values of each potential response.
Rubric Items
If your assessment includes an item that will be graded using a rubric, you can represent that in your assessment definition by editing the answer key, switching to advanced mode, and then assigning 1 point to the 'A' response, 2 points to the 'B' response, and so on up to the total number of points in the rubric.
Keep in mind that optical mark reader response cards typically have responses 'A' through 'E', which allows for at most a 5-point rubric using this method. However, in this case, you can still implement a 6-point rubric by including a second item that has 6 points assigned to the 'A' response. -
To align a question to the curriculum, click the corresponding Align Objectives to Question # link and then select the curriculum statements in the pop up that appears.
Note that an alternative method of aligning to the curriculum is possible later in the process. Specifically, one can navigate to each curriculum statement and specify all the questions aligned to it. -
When you have entered all answers in the answer key, scroll to the bottom if necessary, and then click Save Assessment Definition.
Your assessment definition has now been created. However, the status is still in development and will not be available to be administered until its status is set to Active.
-
Provide default cutoff scores for the specified rubrics and click Save Cutoffs.
-
If you want to align the curriculum to the questions (versus aligning the questions to the curriculum as described in step 2, click the + Select/Align Objectives link in the Curriculum Alignment section. Then, continue to the next step. Otherwise, skip to Step 11.
-
Navigate to the curriculum statements for which you want to align question numbers. Click the edit (pencil) icon next to a curriculum statement you wish to align.
-
Enter the Question Numbers (separated by commas) that you want aligned to the curriculum statement you have chosen. Click Accept to continue.
If there is a specific curriculum statement for which you want to establish cutoffs that are different than the defaults specified earlier, you can specify those cutoffs in the Cutoffs fields in the green shaded section.
-
Continue to navigate and enter question numbers for curriculum statements until you are done. Then use the navigation trail to exit this screen.
-
In the Curriculum Alignment section, review the alignments you made. The edit (pencil) icons next to these alignments allow you to edit them directly.
-
If you are creating an assessment with multiple sections, select Add Section to This Assessment from the Setup drop-down and begin similarly defining the next section.
-
When you have completed defining the assessment, look for a prompt informing you that the assessment definition is still in development. To activate the assessment definition so that it can be administered, click the Click here link as indicated in the prompt to set the status to Active. Once the status is set to active, the assessment definition can be administered as described in the sections of this guide that follow.
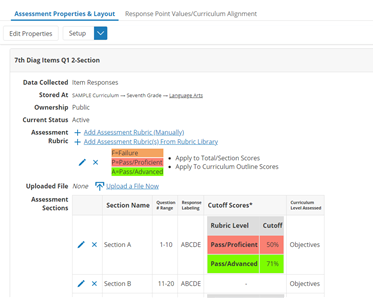
Configure Assessment Rubrics
If you created an assessment definition as described above, you will be able to report curriculum-aligned results based on the curriculum rubric (e.g. Not Proficient, Partially Proficient, Proficient) that has been configured in your curriculum. However, you may also wish to establish proficiency levels for this specific assessment definition and specify minimum cutoff scores that students need to attain to achieve those proficiency levels. Examples of this might include {Pass, Fail} or {Above MLP, Below MLP}.
Depending on what is appropriate for the assessment definition and the desired types of reporting, an assessment rubric can be used to define student proficiency levels for total scores, section scores, and scores for curriculum statements to which the assessment definition is aligned.
It is also possible to set up an "assessment rubric library" containing commonly used assessment rubrics so that they do not need to be defined for each assessment definition.
Set Up an Assessment Rubric and Corresponding Proficiency Levels
-
Click Assessment Properties & Layout.
-
Click Add Assessment Rubric (Manually).
-
Enter a caption (i.e. label or name) for the assessment rubric. Note that this name will appear on reports.
-
Indicate which types of scores to which the assessment rubric will be applied.
-
To apply the assessment rubric to total scores or section scores, check the Total/Section Scores checkbox.
-
To apply the assessment rubric to curriculum statements to which the assessment definition will be aligned, click the checkbox for Curriculum Outline Scores.
-
-
Define the proficiency levels for your rubric. Assign each level a name, a one or two character symbol and a color. Colors are optional, but if provided, allow the reports to be colorized making them easier to interpret. If you are unsure about the best colors, keep in mind that you can easily change them later. Click Accept to save your rubric.
Use the icons to the left of the Proficiency Level Name field to insert or remove proficiency levels.
Make sure the mastery levels are listed from lowest performance (at the top) to highest performance (at the bottom).
Note: If there is a color scheme in the rubric of another assessment definition that you would like to use for this assessment definition, you can bring up this same screen for the other assessment definition, click Copy Color Scheme, and then return to this screen and click Paste Color Scheme.
-
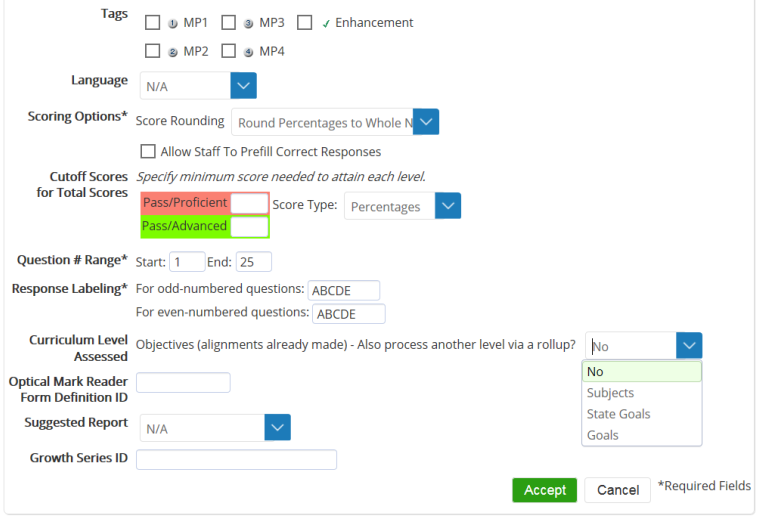
To enter the cutoff scores for the total scores, click Edit Properties.
-
In the Cutoff Scores for Total Scores fields, enter the minimum score students must obtain to achieve each mastery level.
-
You can use the Score Type drop-down to select between either raw score or percentage score cutoffs. The lowest performance mastery level is not shown because that cutoff is assumed to be zero.
-
-
Click Accept at the bottom of the form to save the information. You have now set up the Assessment Rubric.
Add Multiple Assessment Rubrics
This capability is useful if you want to analyze and interpret test scores based on different sets of proficiency levels. Up to five rubrics can be created for an assessment definition.
-
To add an additional assessment rubric, click Add Assessment Rubric again, and then enter an additional set of cutoff scores for the second rubric.
Set Up Rollup Processing
By default, when you score an assessment, the results are reported at the curriculum level you have aligned the assessment definition to. However, there may be cases where you would like to report results at a broader level of the curriculum, as well.
For example, if you have aligned an assessment definition to the detailed objectives level of the curriculum outline, but also would like to report the results for the broader standards level, rollup processing would enable the results at the objectives level to be "rolled up" to the standards level. This means that the score for a particular standard is computed by scoring any questions aligned to any objectives that make up that standard.
To use rollup processing, make sure your curriculum is set up for evaluation at both levels of the curriculum. Specifically, both levels should have a curriculum level rubric as described in Special Programs Curriculum Development.
If the rollup option is missing, this indicates that the broader level of the curriculum has not been set up with a rubric for assessment.
Select Rollup Processing to Report Results on Multiple Levels
You can use Rollup Processing to report results for single-section or multiple section assessments. Note that when the assessment definition has more than one section, you set the assessment properties for each individual section, but not for the assessment as a whole. Refer to the screenshots following the procedure for examples.
To enable rollup processing for an assessment
-
Display the assessment definition, and then click Edit Properties to switch to edit mode.
-
Display the properties for the section.
-
For a single-section assessment, click Set Assessment Properties.
-
For a multi-section assessment, click the Edit (pencil) icon next to the section you want to edit in the Assessment Sections area at the bottom of the page in order to open the Assessment Section Properties pop-up.
-
-
In the Curriculum Level Assessed drop-down, select the level of the curriculum you want to "rollup" the results to.
-
Click Accept to save the information.
-
If you are editing the properties for multiple sections, click Accept, Next Section in the pop-up to set the properties for the next section, and then click Accept when you have finished setting up all sections.
-
-
To edit a section's properties, click the Edit (pencil) icon next to the section.
Single-Section Assessment Example
Multi-Section Assessment Example
If the assessment definition is split into multiple sections, the Assessment Sections area appears at the bottom of the page.