
When a new curriculum resource is created, it is normally stored under a broad area of the curriculum (typically a subject area, standard or goal) for purposes of organization and ease of retrieval. The resource is then aligned to specific objectives or other curriculum statements within that broad area. A curriculum resource is always stored under a single curriculum statement within the resource library but can be aligned to any specific curriculum statements within that broad area and to curriculum statements outside of the area under which it is stored. For example, a curriculum resource for Reading may also touch upon specific objectives in Science or Social Studies.
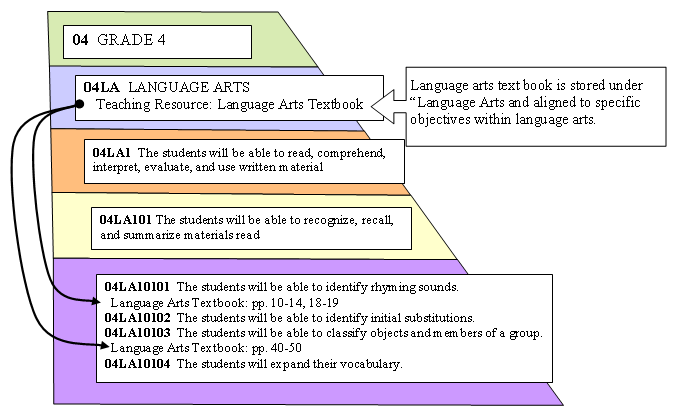
The next illustration shows a Language Arts textbook that is stored under the curriculum statement Language Arts and is aligned to specific objectives within Language Arts.
-
Select Curriculum > Resource Library. The Resource Library page opens.
-
In the Curriculum field, select the curriculum for the resource.
-
In the Resource Type field, select the type of resource to create.
-
If the Owner field appears, make sure Public is selected.
-
Click the checkmark icon next to the curriculum area where you want to store the new resource. The Library Detail page displays a list of existing resources stored under the selected area.
-
To add a new resource, click Add New.
-
Fill out the form to define the resource. The fields you see in the form may vary based on the resource type selected.
-
In the Document Format field, select a document format that allows you to enter the content of the resource as a formatted document. This feature is typically used for lesson plans and may not be available for every type of resource.
-
In the Description field, enter text describing the resource. This field is optional, but we recommend that you enter a description.
-
The Stored At field displays the curriculum statement you selected in Step 5.
-
Select the tag checkboxes you want to assign to the new resource. If authorized to do so, you can add a new tag on the fly by clicking +Add New Tag.
-
If the resource is on the web, enter the URL in the Web URL field.
-
If maintaining publisher information has been enabled for the resource type, you can select a publisher in the Publisher field and complete the related fields (e.g., Copyright Info, ISBN, etc.)
-
-
Click Accept to create the resource.
-
On the Curriculum Alignment page, expand the outline to reveal the statement where you want to align the resource.
-
-
To align the resource and enter a resource description or alignment URL, click the insert alignment with details (insert) icon.
-
To align the resource to curriculum statements without entering any additional details, click the insert alignment with no details (link) icon.
-
-
-
If you used the insert icon in the previous step, a window appears allowing you to enter details for the alignment. Enter information and click Accept.
-
To align the resource to other statements, repeat Steps 9-10.
-
When you are done aligning resources, click on part of the Navigation trail to exit from the curriculum assignment. If you did not select a document format for the resource, you are done defining the resource.
-
If you selected a resource document format in Step 7, the document appears now in edit mode. To complete the document, fill out the text boxes. You can copy and paste from a word processor.
-
If you have curriculum resource alignments available for easy insertion into your lesson plan, click (insert) icon next to a specific resource alignment to insert it into the textbox below.
When you insert resource alignments, they appear in the textbox in a special coded format. After you save, and the document is in view mode, the code format will transform into hyperlinks that can be clicked to access the referenced curriculum resources. -
When the document is complete, be sure to scroll to either the bottom or the top and click Save, Done Editing.
If your curriculum resource has a document, you can add a graphic to the document by uploading a graphic file. The file must be in web graphic formats, such as gif, jpg, or png. Open the document, and then click Upload Graphic. Note that you can upload only one graphic; therefore, if you want to display two diagrams, you must combine them into one graphic.