
Translate a Document Template
Before any documents can be translated, the document template must be translated into the target language. Each document template can support one or more translations.
Translating the document template is done in three parts:
-
Add a language to the template.
-
Translate phrases and section names.
-
Activate the translation for users.
Add a Language
-
From the Administration menu, select Configuration, then click Document Templates.
-
Click the magnifying glass icon next to the template you want to translate.
-
From the Setup menu, click More and select Translations.
-
Click + Add New Language.
-
Select the Language
-
Enter the Translated Template Name. To use the machine translation, click the Use this machine translation (arrow) icon next to the Machine Translation field.
-
Click OK to add the language.
Translate Phrases and Document Section Names
-
From the Administration menu, select Configuration, then click Document Templates.
-
Click the magnifying glass icon next to the template you want to translate.
-
From the Setup menu, click More and select Translations.
-
Click the magnifying glass icon next to the language.
-
Click Edit Translated Phrases.
-
On the Edit (Language) Translations page, enter translations for the phrases in the selected document section.
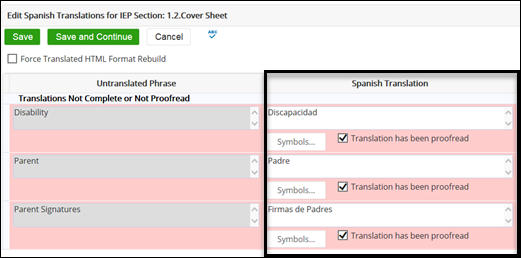
Phrases are grouped into three categories to help you review the phrases that still need to be translated and reviewed. If there are no phrases for a category, the category will not appear. -
To use different text from the original phrase as the source for the machine translation, use the Translation Pad to find the translation, and then copy and paste the translated text into the middle column.
-
Click Save when finished.
-
To provide a translation for the name of the document template section, click Edit Translation Properties.
-
On the Edit (Language) Properties page, enter the translated section name or click the up arrow to use the machine translation.
-
Click Accept.
-
If the document has multiple sections, repeat the process for all the sections in the document template. To translate another section, hover the mouse over the diagonal arrow to display the menu, select another section, and then repeat this process.
Activate Language Translation
-
Click Exit Translations.
-
Click More..., and then select Translations.
-
On the Translations page, click Activate for Users.
HTML Tags in Translated Phrases
Translated phrases may contain special HTML tags. This is necessary to ensure that phrases include enough text to have a sufficient context for translation. Common tags to see in a translated phrase may include:
-
<b>text</b> Bold text
-
<br> Line break
-
<strong>text</strong> Bold text
-
<span>text</span> Text span for applying style
-
<i>italicized</i> Italicized text
-
<u>text</u> Underlined text
-
<sup>text</sup> Superscript text
-
<sub>text</sub> Subscript text
Translation Pad
When the Powered by Google logo appears next to a machine translation, you can click the logo to open the Translation Pad page to enter the source text to be translated. The Target Language field is set to the language selected for the document template.
-
In the Source Text field, enter the text to translate.
-
Copy the text in the Translated Text field.
-
Close the Translation Pad window.
-
Click in the translation field for the phrase and paste the translated text.
Maintaining Document Template Translations
Once a document template is fully translated and active for use, it must be maintained. Forms changes in the untranslated version of the document template may result in untranslated phrases in the translated version.
State/Provincial Model Translations
If your district is on a standard state/province model, translation gaps may arise during state/province version releases involving form changes. Model releases trigger an overnight scan of any document templates changed by the state/province model release, and the system administrator is sent a notification message for each document template with translation gaps. The system administrator may instead direct these notifications to members of security groups that have the "Translate Document Templates" special access security privilege. To do this, the system administrator edits the security group properties of "translator" security groups and establishes a Messaging ID. A Messaging ID allows the security group members to be messaged with a single group identifier. Notification of translation gaps is sent even if the gaps existed before the model release. The notified gaps are consistent with the results displayed using the Find Missing Translations feature described below.
Find Missing Translations
The Find Missing Translations feature is visible if at least one translation has been activated.
-
From the Administration menu, select one of the following:
-
Document Template Translation > Templates.
-
Configuration, and then click the Document Templates tab.
-
-
Click the magnifying glass icon next to the template with the translation you want to verify.
-
From the More menu, select Find Missing Translations.
-
When the scan is complete, click the link for each section where you want to enter translations.
-
Add translations as needed.
Translate a Completed Document
When the translation of the required document template(s) is complete, you can translate individual documents.
-
Open the finalized document you want to translate.
-
On the Navigate To… menu, select Language Translations.
-
Click +Add Translation, select an available language, and then click Accept.
-
Click the magnifying glass icon next to the language.
-
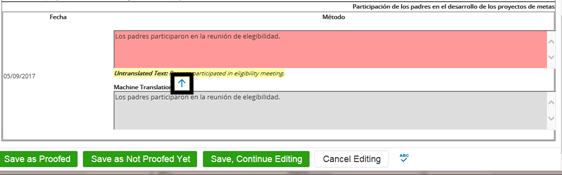
Section by section, complete the translation of individual narrative text fields. Any fields needing a translation appear as a required field. The original untranslated text is displayed below for reference purposes. You can also use the machine translation by clicking the up arrow.
-
After completing a section, click Save as Proofed to indicate that the sections' translations have been proofed. All sections must be proofed before the translated version of the document can be finalized.
-
Once all sections are proofed, select Status from Draft to Final from the Set Document menu.
-
Click the Accept button to finalize the translated document. A link to the document appears on the student's document list.
Insert Accented Characters
-
If you are using Windows, click the Windows Start menu, and in the search box, enter Character Map. Create special characters with various accents. Copy and paste the characters into PowerSchool Special Programs as needed.
-
If you are using a Mac, press and hold the key for the letter with an accent. A menu with accent choices appears.