
For purposes of organization and ease of retrieval, when a new question item is created, it is stored under the broad area of the curriculum (e.g., subject area, standard, or goal) to which it is related. Comparing the Question Item Library to a file drawer, storing a question item is like assigning it to a file folder.
The question item can only be stored under one curriculum area (i.e., placed in one file folder). However, since a question item can be used to test multiple objectives or other curriculum statements, you can align the question item to all the curriculum statements it measures within the broad curriculum area under which it is stored.
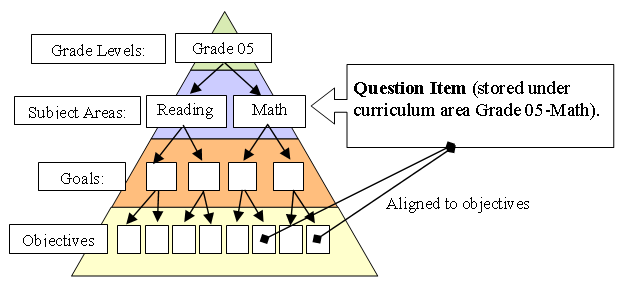
The following figure illustrates the scheme for storing and aligning a question item in a sample curriculum hierarchy.
Create Question Items
You can use the following procedure to create a new standalone question item. It is also possible to create a question sequence, which is a series of questions that all relate to a common narrative and/or graphic. Refer to Create a Question Sequence.
-
Select Assessment > Assessment Library.
-
In the Curriculum drop-down, select the curriculum area where you want to add the question sequence.
-
Click the Question Items tab.
-
Click Add New to add a question.
-
To add questions without first selecting a curriculum area, click Add New on the Question Items page.
-
To add the question to one of the sets of questions stored at a curriculum area, click the checkmark icon next to that curriculum area, and then click Add New on the Library Detail page.
-
If these options do not appear, you do not have the required security privileges.
-
-
On the Add Question Item page, define the question.
-
In the Stored at field, click the Select link and specify where in the curriculum the new question item will be stored. Use the > icons to expand the outline. Click the checkmark icon to select the desired area once it is in view.
-
In the Tags section, select the descriptors that are optionally defined by your school district, and you will only see tags here if any have been defined.
-
In the Question ID (optional) field, either leave the field blank to use a default value or enter an ID if you want to assign the ID that was used in the source for the question item.
-
In the Question Type field, select one of the following:
-
Question Sequence: A question sequence is not a single question, but a related series of questions presented sequentially. This type is covered in Create a Question Sequence.
-
Multiple Choice: The test-taker selects a single choice from a set of pre-defined choices. If you create a question of this type, then in the next step you will define the choices and their point values.
-
True/False: With this type of question, the test-taker selects either true or false.
-
Numeric: With this type of question, the test-taker writes or enters a number, which is scored as correct if it matches the "correct" number. The match is performed numerically, for example, '4' is considered the same as '4.0'. If you create a question of this type, then in the next step you will define the correct answer(s) and corresponding point values.
-
Fill in the Blank: With this type of question, the test-taker writes or enters a word that is scored as correct if it matches the 'correct' word. The match is performed by comparing (letter-for-letter) the word the student entered to the 'correct' word. Upper/lower case distinctions are ignored. If you create a question of this type, then in the next step you will define the correct answer(s) and corresponding point values.
-
Open Ended: The test-taker writes out or enters a textual response that is graded according to a rubric. If the assessment is taken online, the scorer grades the question item using a rubric. If the assessment is taken offline, the scorer can bubble in the 'score' on a scanner card. If you create a question of this type, then in the next step you will define the rubric levels and their point values
-
-
In the Text Format field, select Plain Text to enter question item text with HTML formatting or Stylized Format to display a formatting toolbar to format the question item text.
-
In the Question Text field, enter the main text of your question. To learn how to use HTML to format plain text, refer to the Using HTML to Format Plain Text section that follows.
-
In the Special Accommodations (optional) field, optionally enter special accommodations information that can be printed or will appear on the screen for a student needing special accommodations.
-
In the Notes (optional) field, enter notes for the person proctoring or overseeing scoring of the test. Test-takers do not see this text.
-
-
Scroll down to the Responses section to enter the response information.
-
For any correct responses or responses worth more than zero points, enter the point values.
-
You can click the spell check icon to check your spelling.
About Entering Response Information
The type of question you are entering dictates the appropriate response information to enter. You should enter as many responses as are needed for the question, and leave the rest blank.-
For Multiple Choice, enter the possible choices into the "Response 1", "Response 2", etc. fields. Normally, you give one point to the correct response and leave the points for incorrect responses blank. If the question has two alternative correct responses, you can assign one point to both. You can also assign multiple or fractional points to a response.
-
For Fill in the Blank and Numeric, you normally enter only a single response - the correct one – but if there is more than one correct response, then enter the alternative correct responses as well. For example, if the question was, "Das Boot takes place on a German _______?", then enter "u-boat" and "submarine" into the "Response 1" and "Response 2" fields. As with multiple-choice questions, you normally assign one point to each correct response.
-
For Open Ended, enter the rubric levels used to grade the question and assign point values to those levels. An example rubric is "unsatisfactory" (no points), satisfactory (1 point), above average (2 points), exceptional (3 points).
-
-
-
Click Accept.
Using HTML to Format Plain Text
When entering the question text, you can apply text styles by inserting some basic HTML tags. HTML (hypertext markup language) is the universal language of the web. Follow the examples below to apply text styles.
|
To apply… |
Follow this example using HTML… |
To get this result… |
|
Boldface |
<b>sample text</b> |
sample text |
|
Italics |
<i>sample text</i> |
sample text |
|
Underline |
<u>sample text</u> |
sample text |
|
Larger font |
<font size=+1>sample text</font> |
sample text
|
|
Smaller font |
<font size=-1>sample text</font> |
sample text
|
For additional information on using HTML formatting, including how to format a table, refer to Advanced Question Item Formatting Techniques.
Align Question Items to Curriculum Statements
-
To align the question item to the curriculum statements it evaluates, click Align Question to Curriculum.
-
Expand the curriculum outline to show the curriculum statements you want to align, and then use the checkboxes to align the question item to those statements.
-
Click the Exit Curriculum Alignment link in the navigation path at the top of the screen when done aligning.
-
Review the curriculum statements that have been aligned to the question. To make additional changes, repeat the previous few steps.