
On this page:
Use the Workflow Cases tab to create and manage a student's workflow cases and the documents in each workflow case.
-
Workflow cases are arranged by Category and Case Type.
-
The Workflow Case Status column displays the Workflow Case Status View, which is a linear, timeline-like format showing the workflow case's current step highlighted on the timeline with date information for that workflow step (days until due/days past due).
-
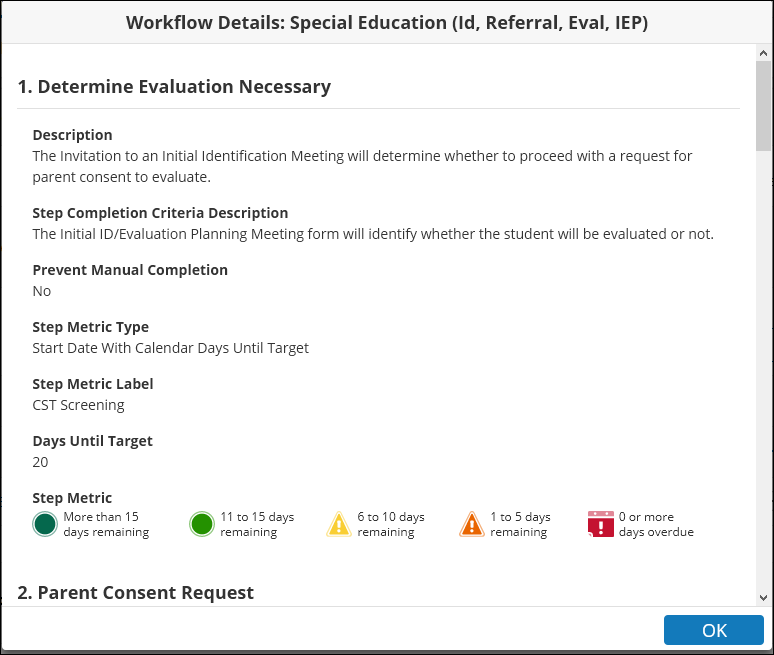
Clicking the Workflow Case Status View opens the Workflow Details dialog box, where you can view more detailed information about the workflow steps within the case.
-
For information about working with documents in a workflow case, refer to Manage Documents Within a Workflow Case.
Create a new workflow case
Refer to Create a New Workflow Case for the procedure to add a new workflow case for the student using the Create Workflow Case wizard.
View student workflow cases
-
Find the student in the My Students panel, or search for the student.
-
Click the documents icon for the student.
-
Click the Workflow Cases tab. Any existing workflow cases for the student appear arranged by Category - Case Type in this tab.
-
You can filter the list of workflow cases using the By Year, By Category, and By Status menus at the top of the tab.
-
-
Click a workflow case title to expand the section to show the documents in the workflow case, including each document's Status, Creation Date, Modification Date, and Finalization Date information, when applicable.
Refresh Workflow Case
The system automatically reevaluates the cases often, but you can use this menu option to manually trigger the reevaluation to make sure you are viewing the current workflow case status. For the workflow case's current step, the step completion criteria are evaluated. If the criteria are met, the case will advance to the next step, and that step's completion criteria are evaluated. This process continues until the case lands on a step where the criteria are not met or until the case is completed.
To manually refresh the workflow case, click the ellipsis button (...) in the workflow case heading, and select Refresh Workflow Case.
Move Workflow Case to Another Step
Allows you to manually move a workflow case to a different workflow step when available. Your district may configure workflow case steps to not allow manual movement between workflow steps.
-
Click the ellipsis button (...) in the workflow case heading, and select Move Workflow Case to Another Step.
-
In the Workflow Case dialog box, click the step to which you want to move the workflow case. The system will evaluate the criteria for the workflow case step. If the criteria are met, the workflow case will automatically move to the first step where the criteria are not met.
Send Message
A Send Message link appears throughout Workflow Case Management windows and dialog boxes. This option enables you to send a message within Special Programs and automatically include a link that recipients can use to go directly to the workflow case or document. Special Programs staff connected to the workflow case or documents within the workflow case are listed at the top of the message, and you can select which staff should receive the notification.
For additional information about messaging options, refer to Messages in the Special Programs User Help.
View Workflow Details
Opens the Workflow Details dialog box, which includes details about the criteria set up for each case workflow step, as well as the step metrics being used to calculate the workflow case status.
Close Workflow Case
Opens a dialog box for you to enter details about why you are closing the workflow case.
-
You can close a workflow case manually, for example, if a parent or guardian refuses to consent.
-
The system can terminate a workflow case automatically when a Workflow Step's Early Case Termination criteria are met.
-
The system can close a workflow case automatically when all of the workflow case steps are completed.
To close a workflow case:
-
Click the ellipsis button (...) in the workflow case heading, and select Close Workflow Case.
-
Select the appropriate Workflow Case Status.
-
Add the reason you are closing the workflow case in the Notes field.
-
Click Close.
Delete Workflow Case
Opens a dialog box for you to confirm that you want to delete the workflow case.
Deleting a workflow case does not delete any of the documents associated with the workflow case. All documents created with the workflow case will still be available in the student's Documents list, but they will no longer be associated with the workflow case, and you will no longer see that workflow case for the student throughout Special Programs. You cannot undo this action.
-
Click the ellipsis button (...) in the workflow case heading, and select Delete Workflow Case.
-
Click Delete.